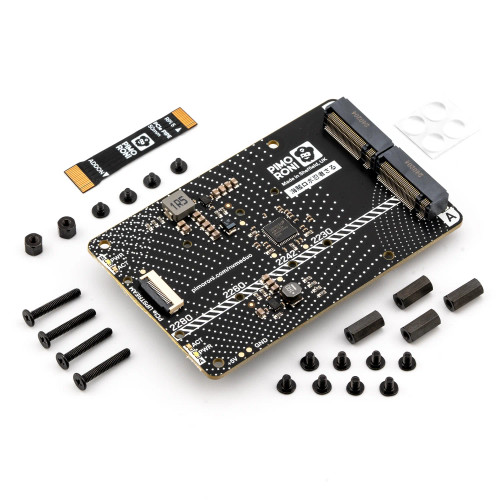

Add two super-fast NVMe SSDs to your Raspberry Pi 5! Ideal if you need redundancy or just a load more storage on your RPi!
NVMe Base Duo is a PCIe Gen 2 extension board for Raspberry Pi 5. Simply populate it with one or two M-key NVMe SSDs (2230 to 2280 sizes supported) and mount it under (or over) your Pi for a compact and fast storage solution - It even comes with rubber feet!
It's the perfect solution for turning your Raspberry Pi 5 into a file server, media centre, reverse proxy, etc. - really any task that benefits from large amounts of fast storage, redundancy, or just to make use of a couple of spare disk - especially with random high operations per second (IOPS) workloads. In short it's a game changer!
NVMe Base Duo follows the new "PIP" design guidelines provided by Raspberry Pi ensuring that it will be easy to use and be supported long term by updates to Raspberry Pi OS - though it is very early days and things are improving rapidly there!
NOTE: It is now possible to boot from NVMe drives installed on NVMe Base Duo! Make sure your Raspberry Pi firmware is updated to the most recent version (2024-05-17 or later).
Includes
- NVMe Base Duo PCB with two M.2 slots (M-Key)
- 'PCIe Flex' Flat Flex Cable
- 4x Rubber feet
- 4x M2 bolt and 2x 5mm standoffs for SSD mounting
- 4x 12mm M2.5 standoffs for base mounting
- 8x short M2.5 bolts for base mounting
- 4x 20mm M2.5 bolts for 'pass-thru' mounting with a HAT
The shipping product may have minor differences to the photos, but will be the same in essentials.
We recommend running the Raspberry Pi 5 at PCIe Gen 2 x 1 speeds with this Base. The total throughput is around 450MB/sec, or 220MB/sec+ per disk for simultaneous access as they share the bandwidth through the PCIe switch.
Drive Compatibility
Pimoroni tested NVMe Base Duo with the following drives successfully. We have usually tested one drive from one batch, so this is not comprehensive, or an 'Approved' list, but it's a good guide for drives to seek out.
In general, as the drives are behind the switch and not being used at boot we’ve found a much wider range of drives to be working and useful compared to the standard NVMe Base.
- ADATA SX8200PNP
- ADATA LEGEND 700
- Crucial CT500P5PSSD8
- Gigabyte GP-GSM2NE3256GNTD
- Kingston SKC3000S512G
- KIOXIA EXCERIA SSD 500GB
- KIOXIA EXCERIA G2 SSD 2TB
- Lexar SSD NM710 1TB
- Netac NV200-512-E4X
- ORIGIN Inception TLC830 Pro 256GB
- Patriot P300 256GB
- Patriot P310 240GB
- Patriot P300 512GB
- PNY CS1030 1TB
- Sabrent Rocket Nano 500GB
- Sabrent SB-RKT4P-1TB
- Sabrent Rocket 4.0 1TB
- Samsung SSD 970 EVO Plus 500GB
- Samsung SSD 980 500GB
- Samsung SSD 980 PRO 1TB
- SK hynix GOLD P31
- TeamGroup TM8FP6256G
- Toshiba KBG40ZNS1T02 1TB
- Transcend TS500GMTE110Q
- WD Blue SN550 500GB
- WD Black SN750 SE
- WD PC SN740 512GB
- WD Red SN700 500GB
- WD Black SN770 1TB
- WD Blue SN570 1TB
- WD Green SN350 480GB
'Avoid' List. We've had problems or reports of problems.
- Ortial ON-750-128 256GB
Otherwise most M.2 NVMe drive (not SATA!) you have lying around should work fine.
Check out the benchmark results over at pibenchmarks.net!
Getting started
For the most hassle-free experience, make sure your Raspberry Pi OS is up to date, and your RPi 5 firmware is updated to 2024-05-17 (May 17th) or newer. The newest version supports all the features of the RPi PCIe spec and means you don't have to mess with config files to get started.
Software update on the RPi OS should do this for you, but to force it you can:
- open a Terminal (Ctrl-Alt-T)
- run
sudo raspi-configand choose 'Latest' under Advanced Options > Bootloader Version.
Running sudo rpi-eeprom-update in the Terminal will tell you which version of firmware is running.
Notes
- Always power off your RPi and disconnect the power supply before installing or uninstalling the NVMe Base.
- NVMe Base Duo offers offers two PCIe Gen 2 M.2 slots behind a PCIe Gen2 Packet Switcher on a general purpose PCIe x1 connection - while Pimoroni know most people want to add fast storage in theory you can use other devices with it, they just can't help you make them work!
For full installation instructions, please see the Getting Started link in the Resources section
Resources
- Up-to-date compatibility list
- Getting Started guide

