QUICK START GUIDE FOR PI KITS - V4
THANK YOU!
Thank you for purchasing from us. We love Raspberry Pi’s, and it’s our goal to get them into the hands of awesome people like you.
If you have any issues with your Pi Kit, please check our FAQ pages at https://support.pishop.ca or https://support.pishop.us/ and contact us by email at support@pishop.ca or support@pishop.us before leaving feedback. We appreciate the opportunity to help you!
VALUABLE RESOURCES
Check out the following Raspberry Pi Foundation resources:
Help Guides: https://www.raspberrypi.org/help
Community: https://www.raspberrypi.org/community/
Projects: https://projects.raspberrypi.org/en/
PRO TIPS
Not all power supplies will work with the Pi. Use a power supply that has proven compatibility with Raspberry Pi boards. Phone chargers often don’t provide a stable enough voltage.
Reconfigure your MicroSD card for a new Pi board. Newer Pi boards have different processor configurations, and require the latest version of the operating system to function properly.
Ensure that your display is powered on, connected to the Pi, and set to the correct input source before plugging in the Pi. These are all required for the Pi’s HDMI output to be activated when starting. You may need to set ‘force HDMI output’ if certain displays are not detected.
Shut down whichever operating system you’re using before unplugging the Pi to prevent corruption of the uSD files and OS.
Avoid holding the board or touching GPIO pins when the board is powered. Shorting the pins can easily damage the board, rendering it unusable.
HARDWARE SETUP
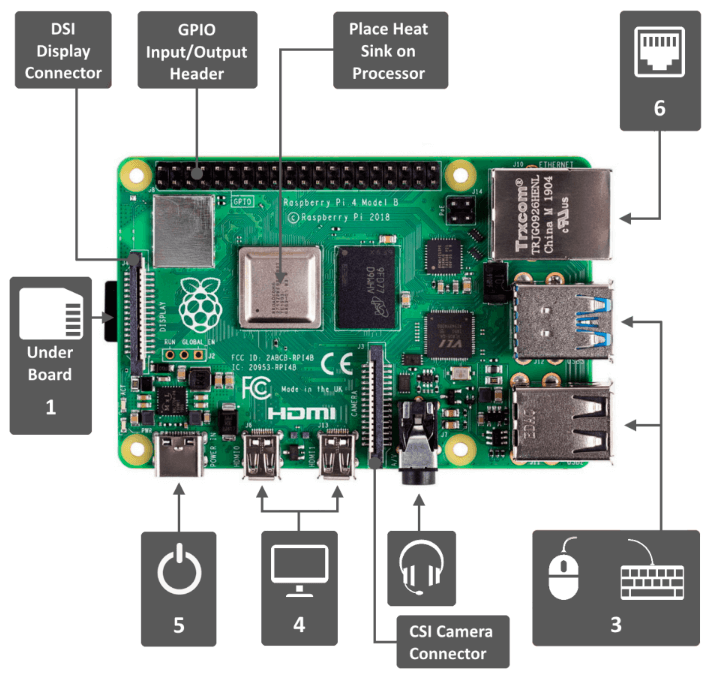
1. Install the Pi board into the case. Press on the dimpled tab to release the lid. Insert the board edge with the HDMI connector first, then press down the GPIO side of the board until it snaps.
2. Insert the microSD card with an operating system installed on it into the card slot. See the ‘Operating Systems’ section to the right if you need an OS.
3. Connect a USB keyboard and mouse. Most wireless keyboards and remotes work perfectly with Raspberry Pi.
4. Connect one or two dispays using a micro-HDMI to HDMI cable. Make sure each display is on, connected to the Pi, and set to the correct input before powering the Pi board.
5. Plug in the USB-C power adapter. The red LED on the Pi indicates power, and the green light indicates processing activity as the Pi boots and functions. Check your SD card if there’s no green light activity.
6. Connect a LAN cable or join a WiFi network.

Operating Systems

If you’re using the Raspbian operating system, you’ll see a graphical desktop environment once the Pi has booted. This is similar to using Windows or Linux, and other applications can be launched from here.

If you’re using the OSMC operating system, you’ll see the Kodi main screen once the Pi has booted. This is the media center application, and the underlying operating system is not visible to you.

If you need an operating system, the Raspberry Pi Foundation has excellent instructions on how to format and configure the microSD card with Raspbian or NOOBS. NOOBS is an OS installer, and allows the choice of several OS’s on first boot. Visit https://projects.raspberrypi.org/en/projects/raspberry-pi-setting-up/3
